CR220SM Log Collection
CR220SM Log Collection
Primary Data Collection
From the Customer Environment:
- Launch the browser of the administrative system console terminal.
- Enter "http://<IP Address>" in the address. (As for the IP address, consult customers.)
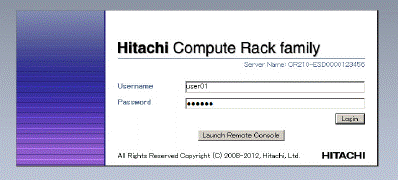
- When the connection is successfully established, the login screen is displayed in the browser.
Log in using "user01" as [Username] and "pass01" as [Password].

Example of a BMC Version "09.43" or earlier. 
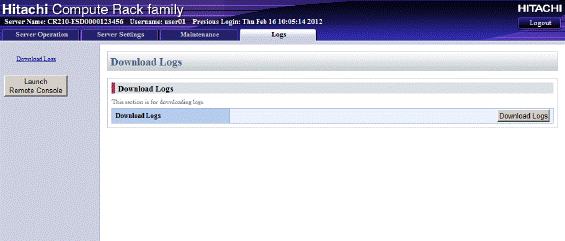
Example of a BMC Version "09.80" or later. - When BMC Version is "09.43" or earlier, Select the [Logs] tab, and press the [Download Logs] button.

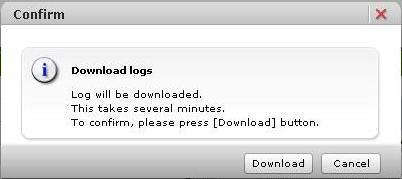
Example of a BMC Version "09.43" or earlier. - When BMC Version is "09.80" or later, Select the [Dashboard] tab, and press the [Download logs] button. When the following [Confirm] dialog box is displayed, press the [Download] button.


Example of a BMC Version "09.80" or later. - Click the [Save] button.

- Select the save location, check the file name (log_(Model type 16 alphanumeric characters)_(Serial Number 24 alphanumeric characters).tar), and click the [Save] button.
- Save the file and upload to TUF.
https://tuf.hitachivantara.com/upload.php
Alternate Data Collection, If unable to use Customer Environment
Necessary Hardware
- PC for Maintenance
- When the maintenance operator connects the PC for maintenance, the IP address and subnet mask of the PC for maintenance must be modified.
In addition, the default gate way must be deleted. Therefore, record the value of the default gate way.
Before using Web Console, check the following browser settings of the PC for maintenance.
If the settings are not appropriately configured, Web Console cannot work correctly.
- Clear the setting for prohibiting pop-up windows.
In addition to the browser function, the relevant settings of toolbars and application must be cleared.
- Enable the Java script. - When the LAN cable of the customer is connected to the management interface connector, check that the Web Console function is not used by the customer, and ask the customer to disconnect the cable.
- The management interface only works with 100BASE-TX.
Link rate and duplex are set to auto-negotiation.
In the PC for maintenance to be connected to the management interface, auto-negotiation should also be specified.
If the link rate of the management interface is 10 Mbps (10BASE-T), this does not meet the operating requirements. Revise the network configuration for connecting to the management interface connector.
- When the maintenance operator connects the PC for maintenance, the IP address and subnet mask of the PC for maintenance must be modified.
- LAN cable
- When the LAN cable of the customer is connected to the management interface connector, check that the Web Console function is not used by the customer, and ask the customer to disconnect the cable.
- Keep pressing the Function switch for 10 seconds or more (could take more than 60 seconds) to set the management interface to the maintenance mode.
In the maintenance mode, ERROR LED is blinking.
(If the management interface is connected to LAN, it cannot be set to the maintenance mode.)

The settings of the network of the management interface in the maintenance mode are as follows.IP address : 192.168.0.1 Subnet mask : 255.255.255.0 Default gateway : Not set DHCP : disabled
In the maintenance mode, ERROR LED is blinking.
When one of the following conditions is satisfied, the maintenance mode is cancelled.
- In the maintenance mode, the FUNCTION switch is pressed for 10 seconds or more.
- The maintenance mode continues for about 30 minutes.
When the maintenance mode is cancelled, ERROR LED returns to the original status.
Note that the maintenance mode is not cancelled by rebooting the system, turning the system off, or disconnecting the AC power supply.
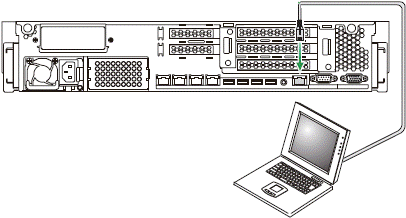
- The maintenance operator connects the PC for maintenance to the management interface connector with a LAN cable.

- Launch the browser of the administrative system console terminal.
- Enter "https://192.168.0.1" in the address
- When the connection is successfully established, the following login screen is displayed in the browser.
Log in using "user01" as [Username] and "pass01" as [Password].
Example of a BMC Version "09.43" or earlier. 
Example of a BMC Version "09.80" or later. - When BMC Version is "09.43" or earlier, Select the [Logs] tab, and press the [Download Logs] button.

Example of a BMC Version "09.43" or earlier. - When BMC Version is "09.80" or later, Select the [Dashboard] tab, and press the [Download logs] button.
When the following [Confirm] dialog box is displayed, press the [Download] button.


Example of a BMC Version "09.80" or later. - Click the [Save] button.

- Select the save location, check the file name (log_(Model type 16 alphanumeric characters)_(Serial Number 24 alphanumeric characters).tar), and click the [Save] button.
- Save the file and upload to TUF.
https://tuf.hitachivantara.com/upload.php - Press the [Logout] button in the upper-right of the screen to log out from Web Console.
If the user does not log out and closes the browser, the status that the user logs in continues until the user is automatically logged out in about 30 minutes.
Therefore, each time the user closes the browser without log out, a new user cannot log in until 30 minutes has elapsed.
- Remove the LAN cable from the management interface connector.
- Keep pressing the Function switch for 10 seconds or more to cancel the maintenance mode.
Check that ERROR LED is not blinking.
When the maintenance mode is cancelled, ERROR LED returns to the original status.
When one of the following conditions is satisfied, the maintenance mode is cancelled.
- In the maintenance mode, the Function switch is pressed for 10 seconds or more.
- The maintenance mode continues for about 30 minutes.
Note that the maintenance mode is not cancelled by rebooting the system, turning the system off, or disconnecting the AC power supply.
- If customer's LAN cable was connected to the management interface connector before, ask the customer to reconnect the cable.
