HDvM and CCI
It is possible to make HDvM 5.x use pre-existing HORCM CONF files which have been setup to control replication. This document discusses how to do this and gives examples of what works and what does not. It may be supported under HDvM 4.x, but I have not tested this.
Required
HDvM 5.x Agent on one or more Hosts
CCI 01-17-03/05 or later installed on Host(s) with HDvM agent
Optional but recommended
Define a Host as a Replication Management Console. Then you can control all replication from one Host. Only this Host needs the HDvM Agent and CCI installed. Obviously, this Host must have access to a non-secured Command Device – so you will want to restrict access to this Host from ordinary users as it can create pairs for all Hosts.
The rest of this document assumes that a Replication Management Console is in use.
Step 1 – Update all HORCM CONF files to HDvM “standards”
HDvM will accept most forms of the HORCM CONF file. However, some sections must be defined in a certain way – or HDvM will not use the files. For example, HDvM 5.0 is not aware of the new features in CCI 01-17-03/05 and above. Specifically, HDvM 5.0 does not understand:
- \\.\CMD-SerialNumber as a valid definition of a CMDDEV
- The new, optional, HORCM_LDEV section which can be used for 9900V, USP, NSC55 and above.
In addition, the following is the default in server.properties on the HDvM server:
server.horcmconfigfile.hostname=ipaddress
By default, server.properties is in this directory:
C:\Program Files\HiCommand\DeviceManager\HiCommandServer\config
Therefore, you must not use “localhost” in HORCM CONF files if you want HDvM to use these files.
The sample configuration file on the next page, HORCM2.CONF, is a sample of a HORCM CONF file that HDvM will always ignore – irrespective of whether you tell HDvM to use it or not.
HORCM_MON
#ip_address service poll(10ms) timeout(10ms)
localhost 11002 1000 3000
#
# First error - localhost not allowed (by default)
HORCM_CMD
#dev_name dev_name
\\.\CMD-10111
#
# Second error - New syntax for CMDDEV not supported in HDvM 5.0
HORCM_LDEV
#dev_group dev_name Serial# CU:LDEV(LDEV#) MU#
#
TC_USP600 DH_TC_USP600_lun1 10111 0A:49
TC_USP600 DH_TC_USP600_lun2 10111 04:43
#
# Third error - HORCM_LDEV section not supported
HORCM_INST
#dev_group ip_address service
#
TC_USP600 localhost 11003
Step 2 – Update Host agent properties file
On the Host to be the Replication Management Console Host, stop the Host Agent service.
Now, update the Host Agent server.properties file as follows:
server.agent.rm.centralizePairConfiguration=enable
server.agent.rm.exclusion.instance=6, 7
server.agent.rm.optimization.userHorcmFile=true
By default, the Host Agent server.properties file is in this directory:
C:\Program Files\HDVM\HBaseAgent\agent\config
- The 1st statement tells HDvM that this Host is a Replication Management Console
- The 2nd statement tells HDvM not to use HORCM6.CONF and HORCM7.CONF – even if the HDvM agent modifies the files
- The 3rd statement tells the HDvM agent to update the HORCM CONF files as required
In my experience, this 2nd parameter is ignored at certain levels of HDvM 5.x.
So, I suggest that if you do not want a pair of HORCM CONF files to be usable by HDvM, you simply use “localhost” instead of “IP Address”. Of course, you cannot use “localhost” for TrueCopy HORCM CONF files if this CCI server is communicating with another CCI server to control TrueCopy.
Always use the \\.\CMD-10111 syntax for describing your CMDDEV as well. This means that the HORCM file will work correctly after a reboot even if the Physical Drive numbers change.
Now start the Host Agent service.
Step 3 – HDvM Agent modifies all “valid” HORCM CONF files
Here is a typical, but complex, HORCM CONF file (HORCM0.CONF). Note that it has been created to be as difficult as possible to understand J.
Unusual features of this file are:
- It contains a CMDDEV for 4 different subsystems
- It contains a mixture of TrueCopy and ShadowImage definitions
- It uses both CL1-A-XX and CL-1-An-XX syntax
- It uses 0 and 000 to represent zero – not recommended, in practice!
HORCM_MON
#ip_address service poll(10ms) timeout(10ms)
10.129.3.127 horcm0 1000 3000
HORCM_CMD
#dev_name dev_name
# USP600 - SN 10111
\\.\PhysicalDrive2
# 9580V - SN 41
\\.\PhysicalDrive5
# USP100 - SN 10262
\\.\PhysicalDrive6
# NSC55 - SN 80025
\\.\PhysicalDrive8
HORCM_DEV
#dev_group dev_name port# TargetID LU# MU
#
TC_USP600 DH_TC_USP600_lun0 CL1-A-18 1 0
SI_9580V DH_SI_9580V_lun0 CL1-A1-11 1 000 0
SI_9580V DH_SI_9580V_lun3 CL1-A1-11 1 003 0
SI_9580V DH_SI_9580V_lun5 CL1-A1-11 1 005 0
SI_USP100 DH_SI_USP100_lun1 CL1-A2-10 1 001 0
SI_NSC55 DH_SI_NSC55_lun0 CL1-A3-6 0 0 0
HORCM_INST
#dev_group ip_address service
#
TC_USP600 10.129.3.127 horcm1
SI_9580V 10.129.3.127 horcm1
SI_USP100 10.129.3.127 horcm1
SI_NSC55 10.129.3.127 horcm1
Nevertheless, HDvM understands this file and will use it correctly.
Here is what the HDvM Agent does to the beginning of this file:
# Edited by dvmraidinit on Wed Jul 26 15:46:11 2006
# Edited by dvmraidinit on Wed Jul 26 15:46:11 2006
# Edited by dvmraidinit on Wed Jul 26 15:46:11 2006
# Edited by dvmraidinit on Wed Jul 26 15:46:11 2006
HORCM_MON
#ip_address service poll(10ms) timeout(10ms)
10.129.3.127 horcm0 1000 3000
HORCM_CMD
#dev_name dev_name
# USP600 - SN 10111
#cu:ldev = 02:03
\\.\PhysicalDrive2 #10111
# SYD9580V - SN 41
#cu:ldev = 0000
\\.\PhysicalDrive5 #0041
# USP100 - SN 10262
#cu:ldev = 00:10
\\.\PhysicalDrive6 #10262
# NSC55 - SN 80025
#cu:ldev = 03:10
\\.\PhysicalDrive8 #80025
The HDvM Agent does not update anything else in the file.
Important Note:
As you can see, the HDvM Agent adds a comment for the cu:ldev of the CMDDEV and a comment for the Serial Number of the array.
However, during one reboot of this Host, after a power failure in the lab, the Host rebooted without the NSC55 being online. In this unusual case, HDvM made serious errors updating the HORCM CONF files which rendered them incorrect and useless.
Therefore:
- Always make your own comments in the HORCM CONF files – showing which CMDDEV belongs to which subsystem.
- If HDvM updates the HORCM CONF files in error, you can always stop the Host Agent, use your own comments to fix the HORCM CONF files and then restart the Host Agent.
- After doing this, Refresh and LUN SCAN all subsystems affected by these files.
Please note that HDvM 5.1 has improved this process. You must have HDvM 5.1.0-01 or above as the server and you must have HDvM 5.1.0-01 Agent installed as well. In this case, you can use the \\.\CMD-SerialNumber syntax in the HORCM CONF file. Here is an example of what the HDvM 5.1.0 Agent does to a HORCM CONF file.
# Edited by dvmraidinit on Mon Aug 28 14:06:56 2006
HORCM_MON
#ip_address service poll(10ms) timeout(10ms)
10.129.148.40 11803 1000 3000
HORCM_CMD
#dev_name dev_name
#
# BNE9570V_2 SN 6802
#
#cu:ldev = 0000
\\.\CMD-6802-0
In this case, only the cu:ldev comment is added. However, there is still a bug in HDvM 5.1 at this point in time. Here is a HORCM CONF file that is not updated correctly.
# Edited by dvmraidinit on Mon Aug 28 14:06:55 2006
# Edited by dvmraidinit on Mon Aug 28 14:06:55 2006
# Edited by dvmraidinit on Mon Aug 28 14:06:55 2006
HORCM_MON
#ip_address service poll(10ms) timeout(10ms)
10.129.148.40 11004 1000 3000
HORCM_CMD
#dev_name dev_name
#
# BNE9570V_2 SN 6802
#
#cu:ldev = 0000
\\.\CMD-6802-0
#
# BNE9200_1 SN 0875
#
#cu:ldev = *
\\.\CMD-875-1
#
# BNE9570V_1 SN 0977
#
#cu:ldev = *
\\.\CMD-977-5
HDvM 5.1.0-01 Agent does not understand serial numbers with less than 4 digits.
So, the recommendation is to use the GUID form of the CMDDEV syntax until HDvM 5.1.0-04, or HDvM 5.5, is in use. Either that, or check the HORCM CONF files after each server reboot.
Step 4 – Restart HDvM
Stop and start the HDvM server. This step may not be required. I did it anyway.
Step 5 – Refresh a subsystem
In limited testing, it does not appear to matter which subsystem you refresh. However, you must refresh at least one subsystem which is contained in the HORCM CONF files. If you do not refresh a subsystem, the changed HORCM CONF files will not be used.
You can stop and start HDvM server as often as you like. You can stop and start the HDvM Agent. Nothing will appear in HDvM until a subsystem is refreshed.
Watching the running processes on the HDvM server, one can see the HDvM Agent “wake up” and do inqraid and other commands using a self created HORCM9xx instance as the last step of the Refresh Subsystem task. Your HORCM instances are not started at this time.
If later you manually edit your HORCM CONF files, you will have to Refresh and LUN SCAN a subsystem again, or the changes will not show up in HDvM.
I recommend that you refresh and LUN SCAN any subsystem which can be affected by the new or changed HORCM CONF files.
Step 6 – View Pair using the new HORCM CONF Files
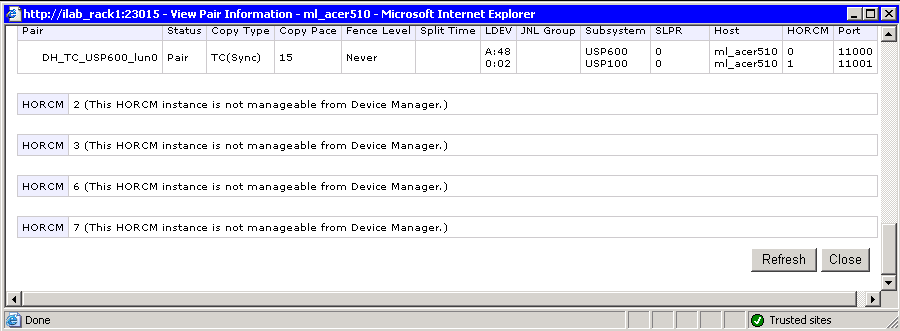
This is what you will now see if you now do “View Pair”.

The Good News
- You can see pair status for all user defined pairs
The Bad News
- You will see pairs for all Hosts, irrespective of which Host you are looking at. If you have 1000 pairs, this will take an excessive amount of time to display and the information will be very hard to read.
- The pair status will not be updated if CCI commands are issued manually. You will have to refresh the Host Agent to see any new status information.
This is what you see for HORCM CONF files which are not managed by HDvM.

Step 7 – Modify Pair(s) using the new HORCM CONF Files
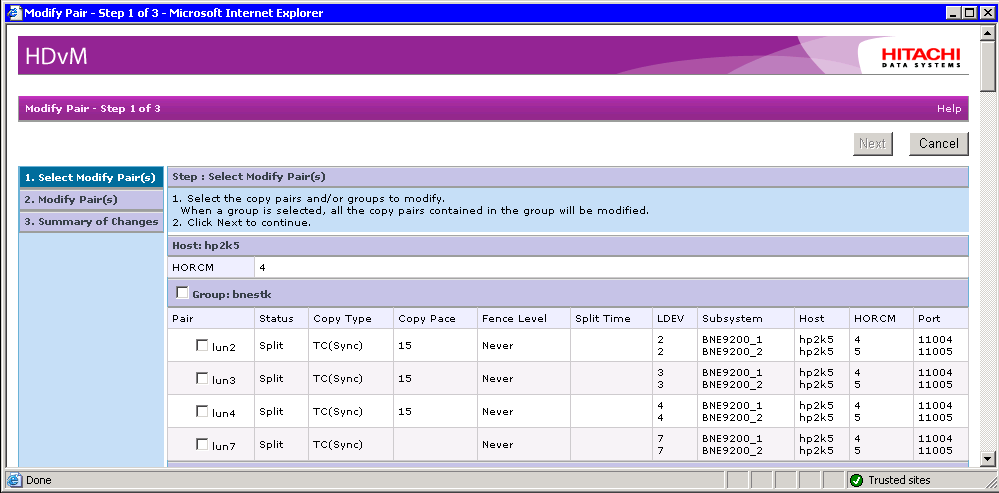
This is what you see if you do “Modify Pair”.

The Good News
- You can split (suspend) pairs that are in pair status
- You can resync pairs that are split
- You can split or resync one LUN, one group or many LUNs/groups at the same time
The Bad News
- Split does not use the –rw option for TC pairs. Thus, the S-VOLS are Read Only. This is next to useless. There is no option to split the pair such that the S-VOL is Read/Write. You will have to do that manually using CCI.
- You cannot create pairs that are in the HORCM CONF file that are not paired yet. If you click Pair Create, you will need to enter all the information again via the GUI and use a different set of HORCM CONF files.
- If you do create a pair via CCI, you will have to refresh a subsystem again before the pair information shows up correctly in the HDvM “View Pair” display.
- If you delete a pair, not only will the pair go Simplex, the pair information will be deleted from HDvM and deleted from your HORCM CONF files. So, you had better keep a copy of these files if you need to put a pair back.
- The first time a “Modify Pair” or “Delete Pair” is done, the HDvM Agent will start both HORCM instances. These instances are left running, even if you stop the Host Agent service.
- If you try to use CCI to manually modify the pairs, you will get the following errors:
C:\HORCM\ETC>set horcminst=0
C:\HORCM\ETC>pairdisplay -g TC_USP600
pairdisplay: [EX_ATTHOR] Can't attached to HORC manager
Refer to the command log(C:\HORCM\log0\horcc_ml_acer510_log.txt) for details.
C:\HORCM\ETC>horcmstart 0 1
Error No:5
Please terminate a process which opens a file under C:\HORCM\log0\curlog.
So, you have to kill the running instances before you can start HORCM yourself manually. Of course, then you must remember to issue horcmshutdown or the Host Agent will not be able to use these HORCM instances.
Conclusion
It all works, however there are some design flaws in the HDvM implementation of pair management. Hopefully these will be fixed one of these days.
